Improving Tone By Reshaping Hammers

Hammers with grooves in the felt on the left. Freshly sanded hammers on the right.

Hammers with grooves in the felt on the left. Freshly sanded hammers on the right.

Over time, the pounding of a piano's hammers against the strings will dig deeper and deeper grooves into the hammer felt. As the felt gets compacted and the area of the hammer that strikes the strings get flatter, larger, and harder, the felt provides less cushion during impact. This causes the tone of the piano will become sharper, more harsh, and more percussive. In addition, harder hammers are more likely to break strings. To restore the tone and correct felt density, the hammers need to be sanded until the grooves disappear.

Before beginning the sanding process, remove the action from the piano and gently lay it on a sturdy workbench.

Marking a guideline for the hammer's strike point.

Marking a guideline for the hammer's strike point.

The marked guideline.

The marked guideline.

The hammers must be carefully sanded so that they retain their original shape. The point of the hammer that strikes the string (a.k.a. the “strike point”) needs to be at the very tip of the hammer. To make identifying the strike point easier, use a straightedge and a pencil to mark a line along the center of the wooden hammer core and out to the edge of the felt. This guideline will let you easily see the optimal strike point during your sanding.

A hammer sanding block.

A hammer sanding block.

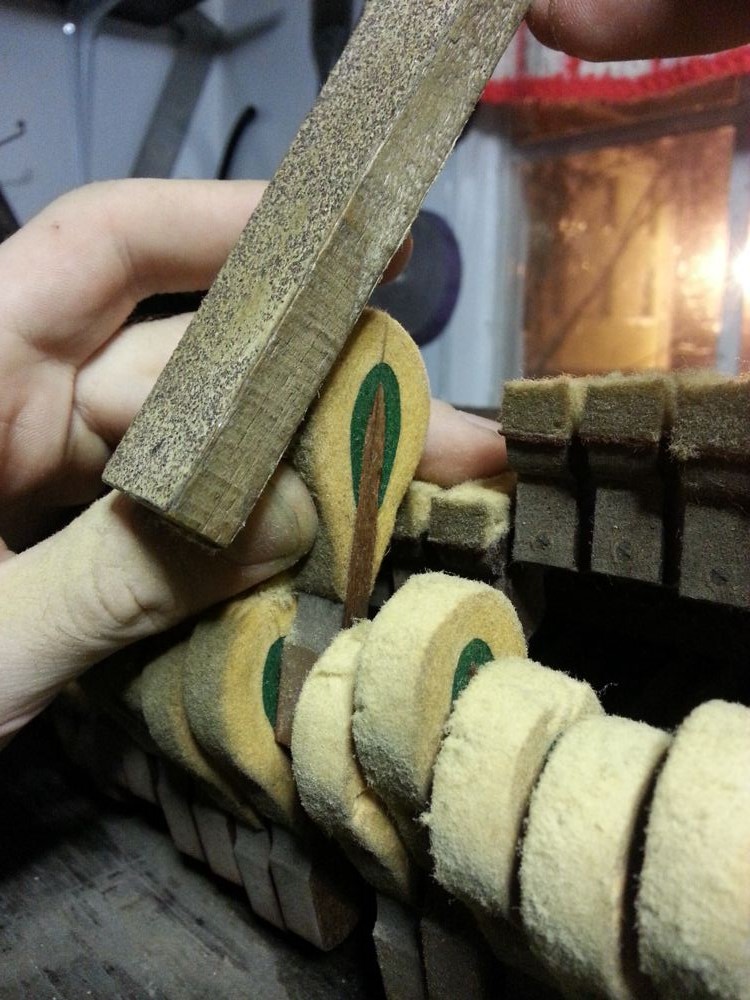
Make a sanding block by gluing a strip of coarse sandpaper to an inch wide piece of wood. Gently but firmly hold the hammer in one hand and use the sanding block to shave felt off of the underside of the hammer. Take your time with this. While sanding, follow the curve of the hammer by moving the sanding block in an arc over it. Always sand toward the strike point of the hammer.

Sanding the underside of the hammer.

Sanding the underside of the hammer.

The lopsided hammer after sanding its underside.

The lopsided hammer after sanding its underside.

Once the grooves on the underside of the strike point have been sanded down, repeat the same process on the top side of the hammer. Keep sanding until the hammer is round again and the tip of the hammer is located on the guideline. While you are doing this, take the bit of extra time to make sure the hammer is round and looks good. Don't leave any flat spots.

Sanding the top side of the hammer.

Sanding the top side of the hammer.

Work your way through each of the hammers. Once you get to the high treble, the felt will be so thin that you shouldn't touch it with sandpaper. Just leave that section alone. Sanding wont change its tone much anyway.

The finished, well-rounded shape.

The finished, well-rounded shape.

Recent Blog Posts


See more of my blog posts here

Hello There! Don't Leave Just Yet!

I provide piano repair information on my blog and through email correspondence free of charge because I like to help people learn about pianos. However, it does take up a significant amount of my time. So, if you are so inclined, you can click the button below to help supply my caffeine habit and show your appreciation for my work. Thank you!

Buy me a matcha latteBuy me a matcha latte

Or Send Bitcoin! bc1q4tz3qzp6a6zeduqema3v6s0vnrhst4zwy4wtp9

Common Bridge Issues

Over time, the tension on the strings causes the holes in the bridge to become enlarged. Note the pin in the center of the photo with the hole on its left side.

Over time, the tension on the strings causes the holes in the bridge to become enlarged. Note the pin in the center of the photo with the hole on its left side.

Does your piano have a section of keys that just sound terrible? Do the strings make clunking or rattling noises? Do single strings have a warbling sound to them? These are common symptoms of issues with the piano's bridges. There are two bridges in a piano: the short (bass) bridge and the long (treble) bridge.

Bridges in a piano have two jobs to do. The first is to provide a termination point for the speaking length of each string (this refers to the section of each string that is struck by the hammer, vibrates, and produces the desired sound. There are several non-speaking sections of each string that are usually muted with strips of felt). The termination point is achieved by the use of iron “bridge pins.” These pins are sturdily embedded in the wood of the bridge and provide the lower end point of vibration for the strings. The second purpose of the bridges is to transmit the vibrations of the strings to the soundboard where they can be amplified to produce the volume that we expect from a piano.

The most common issue with the bridge is that of loose bridge pins. Over time, the sideways force exerted by the string causes wood surrounding the bridge pin to be crushed. This causes a loose fit of the pin in the bridge and can cause the noisy issues described above. There are other ways that a bridge can fail that will also cause these issues, but I won't get into those here.

The way to fix this problem is to remove the offending strings from the bridge, pull out the loose bridge pins, fill the enlarged holes with epoxy, drill new bridge pin holes, insert the bridge pins, and reinstall the strings.

The strings that pass the offending bridge pins must be loosened slightly.

The strings that pass the offending bridge pins must be loosened slightly.

After identifying the bridge pins you want to work on, follow the strings up to the tuning pins. Before working on the bridge, you need to loosen each of the tuning pins that correspond to the strings over the target bridge area. If you are working in the tenor section, take a closer look at the three strings. One of them will loop around a hitch pin at the bottom and double as a string for an adjacent note. The tuning pin for this string must be loosened as well. Turn the tuning pins in small amounts while lightly pulling the strings towards you. This will keep the coils tight around the tuning pins while they unwind. Keep loosening the tuning pins until the strings have enough slack to pull them away from the hitch pins and the bridge.

If there are enlarged holes in the long bridge in the area underneath the bass strings, you will have to remove several of the bass strings to gain access to that part of the bridge.

Holding tension on the strings while turning the tuning pins. I wear gloves to prevent any moisture on my hands from causing the strings to rust.

Holding tension on the strings while turning the tuning pins. I wear gloves to prevent any moisture on my hands from causing the strings to rust.

The loosened strings after being pulled away from the bridge.

The loosened strings after being pulled away from the bridge.

Using a lineman's pliers, note the angle of the pins, and pull them straight out along that angle. 

Pulling out the bridge pins.

Pulling out the bridge pins.

A removed bridge pin.

A removed bridge pin.

Use a piece of cardboard or styrofoam to keep the bridge pins in the correct order.

Keeping the bridge pins in order. Note how the right-most string of the note next to the one being worked on has also been removed.

Keeping the bridge pins in order. Note how the right-most string of the note next to the one being worked on has also been removed.

Once all of the offending bridge pins have been removed, cut and mix a small amount of PC wood epoxy putty and fill the enlarged bridge pin holes. After the epoxy has hardened, sand it flush with the bridge.

The bridge after filling with epoxy and sanding.

The bridge after filling with epoxy and sanding.

Measure the diameter of your bridge pins with a micrometer and acquire a drill bit of the exact same diameter or of the closest wire gauge size on the smaller side (an overly tight bridge pin is better than a loose one). Drill new bridge pin holes while trying to duplicate the angle of the surrounding bridge pins as closely as possible. Push and twist the bridge pins back into place, reinstall the strings, and pull them back up to pitch.  Any buzzing, warbling, or clunking will hopefully be eliminated.  If not, you may have more serious bridge problems.

The bridge with one pin re-installed and a second hole drilled.

The bridge with one pin re-installed and a second hole drilled.

Recent Blog Posts


See more of my blog posts here

Hello There! Don't Leave Just Yet!

I provide piano repair information on my blog and through email correspondence free of charge because I like to help people learn about pianos. However, it does take up a significant amount of my time. So, if you are so inclined, you can click the button below to help supply my caffeine habit and show your appreciation for my work. Thank you!

Buy me a matcha latteBuy me a matcha latte

Or Send Bitcoin! bc1q4tz3qzp6a6zeduqema3v6s0vnrhst4zwy4wtp9

Replacing Loose Tuning Pins

Every once in a while, I go out on a tuning job only to find that the piano in its current state is impossible to tune. Some tuners throw this sentiment around whenever they encounter a piano that is worth anything less than a few thousand dollars. “Impossible to tune” to these kind of tuners just means that the piano is incapable of sounding like a nine-foot concert grand. That's not what I'm talking about. These pianos of “lesser value” are in many cases much more important than the ones in the concert halls and auditoriums. These pianos are seen and heard every day. They bring warmth to homes and joy to the people in them. So, when I say “impossible to tune”, I mean it literally. The piano is physically incapable of making music. The most common reason for this is because the tuning pins have lost their grip.

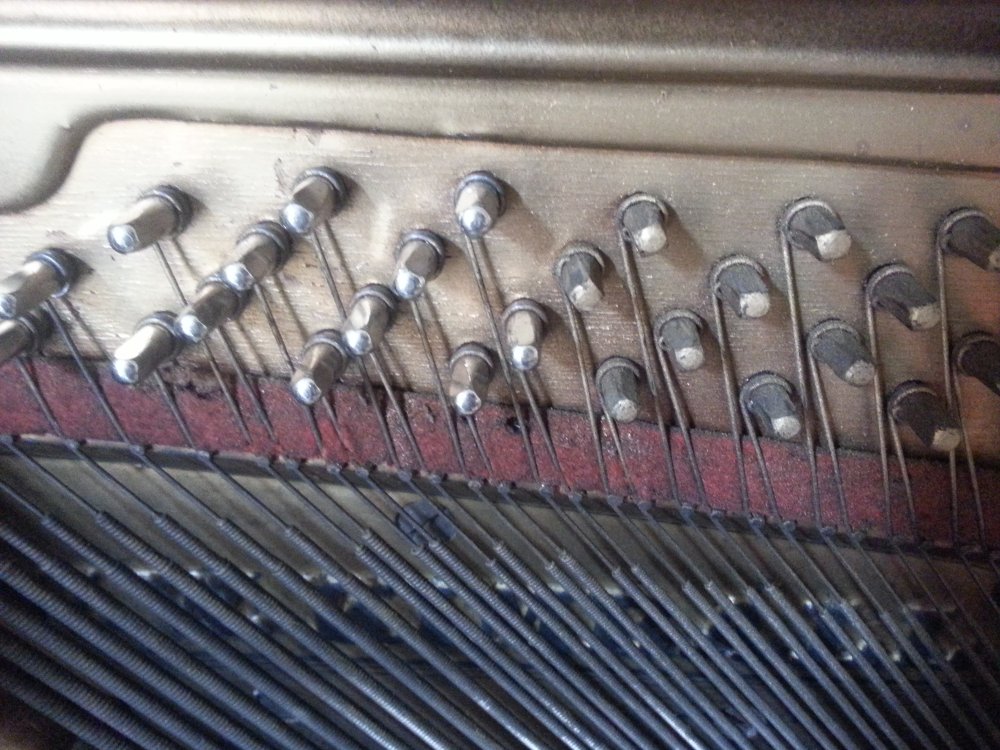
Bass tuning pins in a Kimball upright. The shiny pins on the left are slightly larger replacement pins. The dull pins on the right are the originals that no longer are able to do their job of holding tension on the strings.

Bass tuning pins in a Kimball upright. The shiny pins on the left are slightly larger replacement pins. The dull pins on the right are the originals that no longer are able to do their job of holding tension on the strings.

In my post “Loose Tuning Pins CA Glue Repair” I described a procedure that is used to tighten-up  tuning pins that are slightly loose. Sometimes the pins have gotten so bad that CA glue won't do enough to make the piano functional again. In these cases, it is necessary to replace the tuning pins with slightly larger ones.

The way that a piano holds tension on its strings is by having one end of each string looped around a stationary iron “hitch pin” and the other end wound around a tuning pin. These pins are between 2 and 2-1/2 inches long, however only about an inch of them is visible. This is the part that the string is wound around, as well as the part that a tuning wrench is placed over in order to turn the pin (changing the tension on the string and consequently changing the pitch of the string). The other inch and a half of the pin is tightly embedded in a laminated block of wood called the "pinblock". The pinblock is made of several sheets of wood that are glued together so that the grain of each layer runs in a different direction than the layer next to it. This layering adds a lot of strength and resilience to the wood. This is vital when each of the 200+ pins has about 150 pounds of tension on it.

The tuning pin and coil after loosening 3/4ths of a turn.

The tuning pin and coil after loosening 3/4ths of a turn.

Over time, the wood fibers in the pinblock get slightly crushed and start to loose grip on the tuning pins. When this happens, the pin requires significantly less force to turn, and in bad cases the tension of a string at the proper pitch is enough to turn the pin all on its own. This is what I am talking about when I say “impossible to tune”. The string can be pulled up to pitch, but as soon as the tuning wrench is released, the tuning pin slips in the pinblock and the string goes out of tune.  In these cases, the best solution is to remove the tuning pins and replace them new, slightly larger pins.

If you plan in replace a large number of tuning pins, you want to be sure that the larger pins are actually going to help your problem. If the pinblock of your piano is severely cracked or has delaminated, it needs to be replaced before any other work is done. If you are unsure as to the condition of the pinblock, it may be worth it to just replace a pin or two here and there across the length of the piano, pull the strings up to pitch, and wait for a few weeks while occasionally giving a firm strike on each of the corresponding keys. If the strings with the replaced pins haven't drifted far out of pitch at the end of this test period, you can go ahead and replace the rest of the pins.

Before you start, you will need a tuning wrench, new tuning pins, a tuning pin setter or punch, a hammer, a thin flathead screwdriver, and a few different sets of pliers. 

Tuning pins come in sizes ranging from .276” to .306” in diameter and in .005” increments. To determine the size you need, remove one of the loose tuning pins by turning it counter-clockwise until the string is loose enough to remove from the pin (about 3/4ths of a turn). The string has a tight bend at the end (called a becket) that is inserted into a hole in the center of the pin. Pry the becket from the hole with a flathead screwdriver. 

Prying out the becket.

Prying out the becket.

Releasing some tension by pulling the string off of the termination pin.

Releasing some tension by pulling the string off of the termination pin.

In the bass of many upright pianos, you can release a bit more tension by pulling the string over the termination pin just below the tuning pins. The coil can now be pulled all the way off the tuning pin. Using a tuning wrench or a string crank, turn the pin counterclockwise until it comes free from the pinblock.  Using a micrometer, measure the diameter of the pin. Find your size here: http://www.vandaking.com/s-210-piano-tuning-pins.html. If your old tuning pins loosened instantly under proper string tension, order new tuning pins that are two sizes larger. If the old pins loosened slowly over time under proper string tension, order one size larger. Make sure you get new pins that are the same length as the originals.

The coil fully removed from the tuning pin.

The coil fully removed from the tuning pin.

Spinning the pin out with a stringing crank.

Spinning the pin out with a stringing crank.

The tuning pin has been removed.

The tuning pin has been removed.

At this point, there is a bit of disagreement between piano technicians as to the proper technique. Some technicians will drill or ream out the tuning pin hole to a size just slightly smaller than the diameter of the new pin. Others will clean out the hole with compressed air, a vacuum, or a long slender brush. Some technicians don't prep the tuning pin hole at all. In this case, the pins were already so loose that the holes did not need to be re-sized, and so I went right ahead and hammered the new pins in.

The tuning pin setter and the new tuning pin ready to be hammered into the pinblock.

The tuning pin setter and the new tuning pin ready to be hammered into the pinblock.

In order to install the new pins, use a tuning pin setter and a hammer to tap the new pins straight into the pinblock. Only tap the pin in until it sticks out just slightly further than the original pins around it. The goal is for the bottom of the string coil to end up 3/16ths of an inch away from the plate (or the pinblock if the plate doesn't cover the full height of the piano). Pull the coil onto the new tuning pin and insert the becket into the tuning pin hole. If you pulled the string off of the termination pin earlier, place it back along its original path. Make sure that the string is still following its path through the bridge pins down below the keyboard. From this point, you will follow the same directions in my “Replacing a Broken String” tutorial.

The new pin after hammering.

The new pin after hammering.

Placing the coil on the new pin.

Placing the coil on the new pin.

To see more photos of this procedure, take a look at Chuck Behm's instructions in this helpful PDF.

Checking to make sure the strings are all still following the correct path over the bridge.

Checking to make sure the strings are all still following the correct path over the bridge.

The pin after bringing up to pitch.

The pin after bringing up to pitch.

Recent Blog Posts


See more of my blog posts here

Hello There! Don't Leave Just Yet!

I provide piano repair information on my blog and through email correspondence free of charge because I like to help people learn about pianos. However, it does take up a significant amount of my time. So, if you are so inclined, you can click the button below to help supply my caffeine habit and show your appreciation for my work. Thank you!

Buy me a matcha latteBuy me a matcha latte

Or Send Bitcoin! bc1q4tz3qzp6a6zeduqema3v6s0vnrhst4zwy4wtp9

Replacing Player Piano Pouches

This post is a continuation of the Milton Player Piano Series.

A dissembled player piano action showing from the top to the bottom: pneumatics, primary valves, and the leather pouches that activate them. Note the hole in the pouch at the bottom center of the photo.

A dissembled player piano action showing from the top to the bottom: pneumatics, primary valves, and the leather pouches that activate them. Note the hole in the pouch at the bottom center of the photo.

A damaged leather pouch.

A damaged leather pouch.

In my last player piano post, I described the procedure of cleaning the valves that direct the flow of air and vacuum inside the player action. This time, I am replacing several of the small leather pouches that control the valves. The leather on these pouches is pretty well protected inside the valve chest, but it is very thin and vulnerable to any debris that gets sucked into the action.

My player piano had one missing pouch and two damaged ones. I purchase my replacement pouch leather from Schaff Piano Supply. I believe that the smallest amount that you can purchase is 7 sq. feet which is enough to replace all of the pouches in the action.

In their resting state, the pouches are “deflated.” When a music roll is played, air is allowed underneath the pouch which causes is to “inflate” and push on the wooden buttons that I mentioned in my post “Cleaning Player Piano Valves”. For the pouches to inflate properly, they must be airtight and have the correct amount of “dish” or concavity.

The first thing to do is to carefully remove the old pouch with a razor blade. If you are only replacing a few pouches, be careful not to damage any their neighbors. If more than a couple are damaged or are no longer airtight, it is a good idea to remove and replace all of the pouches.

The "pouch well" can be seen after removing the leather.

The "pouch well" can be seen after removing the leather.

Find a round object that is the same size as the old pouches. This will be your template to trace out the new pouches. I used the inside diameter of a roll of electrical tape. Trace the template onto your pouch leather and cut it out with a scissors.

Using a brush, apply a small amount of liquid hide glue to the edge of the pouch well. Wrap the glossy side of the leather around a coin and drop it into the well. It important that the matte side of the leather is against the wood, as the glossy side will not adhere as well. Use your finger to smooth the pouch leather outward and against the wood. If you are replacing all of the pouches, it can be a good idea to purchase a vacuum-operated pouch tool. This tool ensures that each pouch is given the perfect and exact same amount of dish.

A small amount of hide glue applied to the outside of the pouch well.

A small amount of hide glue applied to the outside of the pouch well.

The new pouch leather dropped into the well.

The new pouch leather dropped into the well.

Allow the hide glue to dry for 24 hours before testing the player action.

The pouch after smoothing the edges.

The pouch after smoothing the edges.

The replaced pouch.

The replaced pouch.

Recent Blog Posts


See more of my blog posts here

Hello There! Don't Leave Just Yet!

I provide piano repair information on my blog and through email correspondence free of charge because I like to help people learn about pianos. However, it does take up a significant amount of my time. So, if you are so inclined, you can click the button below to help supply my caffeine habit and show your appreciation for my work. Thank you!

Buy me a matcha latteBuy me a matcha latte

Or Send Bitcoin! bc1q4tz3qzp6a6zeduqema3v6s0vnrhst4zwy4wtp9

Buying a Used Piano

If you are looking to purchase a used piano, your options can be a bit overwhelming. Between the hundreds of pianos on Craigslist, at piano dealers, thrift shops, estate sales, and furniture liquidators, it can be hard to know which style you want and which piano is worth your money. In addition, there are countless different piano manufacturers that have existed over the past 100 years, some of which can be very hard to find any helpful information about. Be diligent about doing your research before purchasing an instrument. With over 5,000 distinct parts in an upright piano action, there are a lot of things that can go wrong. You want to make sure that you know of any serious problems before you open up your wallet and bring a 600+ pound piece of furniture into your home. I recommend familiarizing yourself with some basic piano anatomy. If you find something that doesn't look right in a piano, you want to be able to communicate about it in a way that another person will know what you are talking about.

Paying a piano technician to accompany you while you look at a used piano can be a great way to get a better idea of a piano's value and condition. Keep in mind that there are technicians who spend most of their time working with high quality pianos that are worth tens of thousands of dollars and that they may push you to purchase a high quality piano and consequently spend more money than you are comfortable with. Be realistic. If this is a piano that is only going to be used for your own enjoyment in your own home, you can probably get along with a lower quality piano just fine, even if it has some imperfections.   

Start by opening the lid and looking inside of the front panel of the piano. The front panel is often held in by two clips, screws, or pins; one on each end near the top edge. Be sure to carry a flathead and a Philips-head screwdriver with you in case the panel is held by screws. Once any fasteners have been removed, the front panel can be lifted away from the piano in order to get a better view of the action.

The first thing to do when checking out a piano is to play every key on the keyboard, starting from the bottom and moving along all the way to the top. Play each key several times in quick succession and at varying volume. Have the lid of the piano open while you do this and keep an eye on each hammer as it strikes the strings. Take note of any keys that move sluggishly or get stuck at any point in their movement. Listen for any knocking or clicking noises that occur when a key is pressed or when it is released. Look for hammers that are slow to return to their starting position, hammers that don't return at all, or single keys that cause multiple hammers to move at once. Most of the time, these symptoms don't indicate any particularly serious problems, but they can stack up quickly and result in an expensive repair bill. Listen to the tone that each key produces, if every note sounds OK by itself, that is a good sign, even if the piano as a whole is out of tune. The real trouble is when any key played alone produces a particularly dissonant tone. This can signal that there are issues with the pinblock. Sometimes this requires drastic measures to repair and can cost more than the piano is worth.   

Look for pitted or detached hammer felt. Holes in the felt indicate a rodent or insect problem that may or may not still exist in the piano. Detached felts need to be re-glued to the wooden hammer core. Check for broken bridle straps. This is a common problem and can often be repaired without the help of a piano technician.   

Pitted hammer felt caused by rodents

Pitted hammer felt caused by rodents

Each of the 88 notes should share most of the same parts. Look for any note that seems to be missing a part that most of the other notes have. Keep in mind that the top 20 notes or so will not have dampers or any of the parts associated with dampers. Look for any stripped screw heads and for rusty, broken, or missing strings. Wound bass strings are much more expensive to replace than treble strings. Test out each of the pedals. Do they feel solid when depressed all the way or do they feel squishy? Squishy pedals can be a signal of damage to the bottom board of the piano. Watch the action as you press the damper pedal and notice if the action responds evenly all the way across the piano, or if the action responds at one end first and moves like a wave across to the other end. This can be a signal that the damper lift rod and its hinges have been bent or damaged.

The top 20 or so notes in the piano do not require the damper mechanism

The top 20 or so notes in the piano do not require the damper mechanism

Take an eye-level look at the front of the keys. Keys that are evenly spaced and level are a sign of a piano that was well taken care of. This piano was not.

Take an eye-level look at the front of the keys. Keys that are evenly spaced and level are a sign of a piano that was well taken care of. This piano was not.

Remove the bottom panel by pushing upward on the one or two springs that are fastened to the underside of the keyboard and tilting the top of the panel toward you. Check inside of the piano for felt, leather, springs, or screws that have fallen out of the action. Also look for any piles of debris or feces that indicate the presence of rodents. Shine a light on the soundboard and bridges behind the strings to look for any cracks in the wood. Small cracks are usually not a problem, but large ones can cause unpleasant buzzing or rattling noises as well as loss of volume and they can be expensive to fix. Also look at the bridge and hitch pins that the strings curve around. Look for pins that have become dislodged from their original place in the bridge. You will see a hole where the pin originally entered the bridge that has become widened over time. Small cracks or holes in the bridges can be repaired on site with epoxy, but larger problems will require the piano to be sent to a repair shop so that new bridges can be created and installed. Check over the cast iron plate for any damage or cracks. The plate needs to resist thousands of pounds of tension created by the strings, and any weak points in it can cause big problems.

Another important thing to look for, especially in the Gulf Coast region, is flood damage. The last thing you want is a piano that has spent time sitting in water. The wood swells, glue joints break, and strings, pedals, and the cast iron plate will rust. Avoid these pianos, unless you know that they are salvageable and are worth the cost of restoring them.

Finally, pull the piano out from the wall and inspect the back. Look for any damage that may have occurred to the cabinet when the piano was moved and take another look at the soundboard as well as the ribs that span across it. Make a note of any sections of the soundboard that have separated from the ribs. These separations can usually be repaired by using toggle bolts, but it will be an extra expense that involves drilling holes through the ribs and soundboard.

Recent Blog Posts


See more of my blog posts here

Hello There! Don't Leave Just Yet!

I provide piano repair information on my blog and through email correspondence free of charge because I like to help people learn about pianos. However, it does take up a significant amount of my time. So, if you are so inclined, you can click the button below to help supply my caffeine habit and show your appreciation for my work. Thank you!

Buy me a matcha latteBuy me a matcha latte

Or Send Bitcoin! bc1q4tz3qzp6a6zeduqema3v6s0vnrhst4zwy4wtp9